

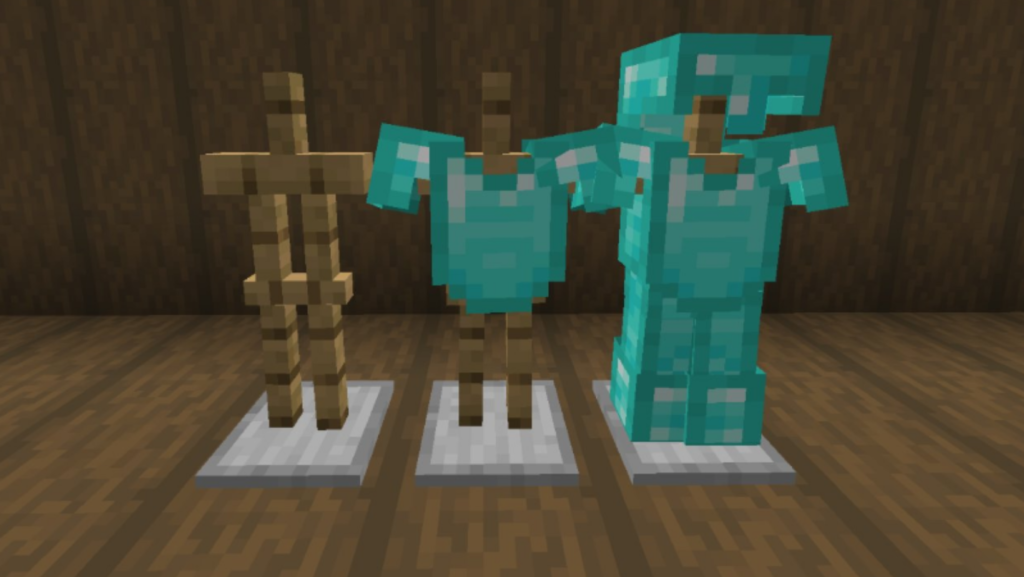
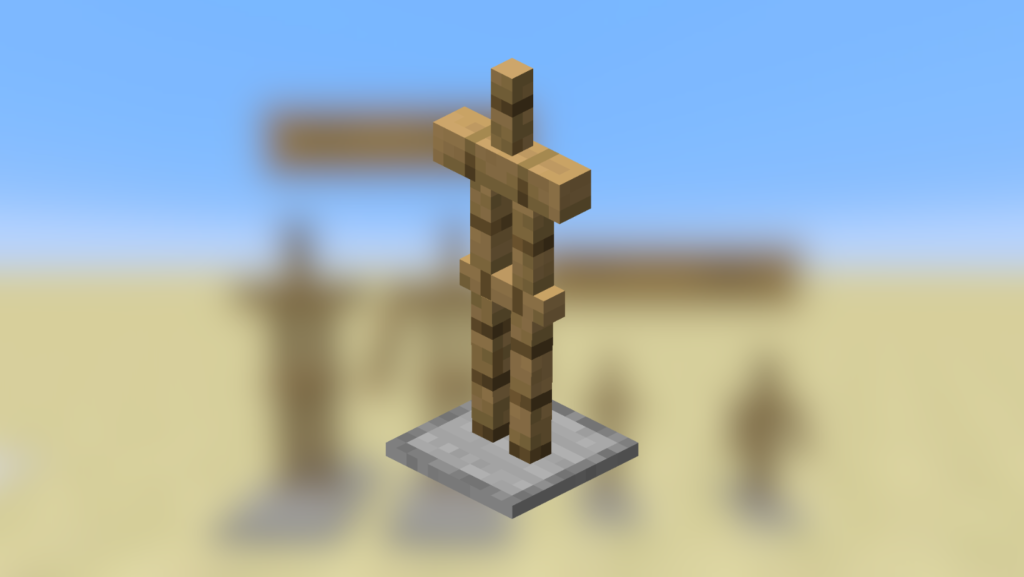
Minecraft fans understand the appeal of constructing and customizing their virtual environments. Among the numerous unusual objects available, the armor stand stands out as a canvas for creativity as well as a display unit. You can display your favorite wearable goods, such as armor, elytra, or even pumpkin heads, with the correct armor stand recipe. Consider it your in-game mannequin, ready to adorn whatever masterpiece you’ve created in your most recent journey.
The beauty of the armor stand isn’t just in its appearance. It’s also a matter of practicality. Are you sick of searching chests for that enchanted helmet or those diamond boots? You may keep all of your cherished wearables in one location, on display, and easily accessible, by mastering the armor stand recipe. Plus, with a little imagination, you may create dynamic scenes or sculptures. Imagine walking into your Minecraft home and being greeted by a row of armor stands, each telling a tale! Dive in and let’s find the magic together.
Armor Stand Recipe Attributes
When embarking on the journey to craft using the armor stand recipe, it’s essential to know the stand’s physical attributes. These utility items, commonly found in the Minecraft universe, possess unique characteristics that set them apart.
- Sizes: The regular size boasts a width of 0.5 blocks and stands nearly 2 blocks tall with a height of 1.975 blocks. For those looking for something more compact, there’s the small version, which has a width of 0.25 blocks and stands just shy of 1 block at 0.9875 blocks tall.
- Durability: The armor stand’s durability is noteworthy too, with a total of 20 health points. This makes them relatively sturdy, ensuring your showcased items remain standing.
- Rarity: On the rarity scale, they’re categorized as “common,” implying they’re not too hard to come across in your Minecraft explorations.
- Stackability: While in the Java Edition (JE) you can stack up to 16 of these stands, the Bedrock Edition (BE) offers an impressive stackability of up to 64! However, take caution, as these stands are flammable.
Understanding these properties ensures you make the most of your armor stand recipe and can strategically place and use your stands in the game. Whether it’s to display your collection of enchanted gear or create an artistic sculpture, being informed is key.
Crafting the Armor Stand Recipe in Minecraft
Embarking on the creation of your in-game display unit? The armor stand recipe is straightforward and satisfying. To craft this versatile item, a few essential materials are required, and some easy-to-follow steps ensure a successful build.
Essential Components
- Sticks: The primary framework of your armor stand, sticks are the backbone of many Minecraft creations. You’ll need six of them for this endeavor.
- Smooth Stone Slab: A sturdy base is crucial to ensure your armor stand remains upright. For this, a smooth stone slab is perfect.
Explore more from us: Master How to Brew Minecraft Strength Potion in 10 Steps
Producing Stone Slabs
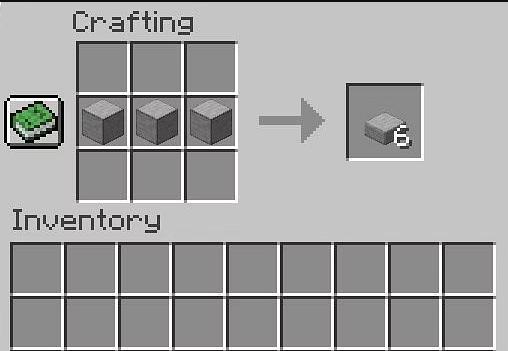
Stone slabs are more than simply a cosmetic element in Minecraft; they also serve a purpose in a variety of production procedures. You will not be using a crafting table to make these slabs. Instead, concentrate on the furnace. Begin by converting cobblestone, one of the game’s most prevalent blocks, into stone. Smelting cobblestones yields stones. After that, arrange three stones horizontally in your crafting table’s second row. Voila! You’ve obtained some stone slabs.
Making Sticks:
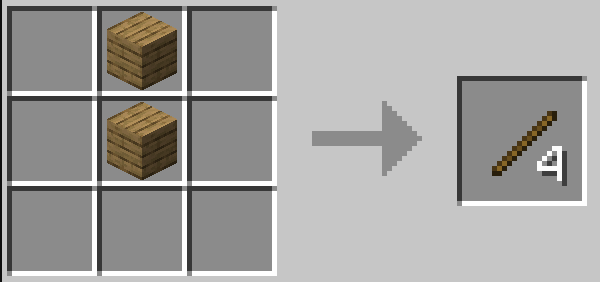
Sticks are vital in Minecraft, serving as key components in many recipes. And making them is simple. You may swiftly make four sticks by arranging wooden planks in the crafting grid. Sticks aren’t just branches in the world of Minecraft; they’re the building blocks of adventure. With these components on hand and the armor stand recipe in hand, you’re ready to proudly display your armor!
Crafting an Armor Stand:
Embarking on the journey of creating your own armor stand in Minecraft? Let’s guide you step by step through this armor stand recipe to ensure you craft it successfully and efficiently:
- Access Your Crafting Table: Before anything else, head straight to your crafting table. This essential tool, familiar to all Minecrafters, will provide you with a 3×3 grid. This grid is your canvas for the armor stand recipe.
- Position the Materials Accurately: Accuracy is key! To craft the armor stand, the placement of materials on the grid must be precise. So, here’s the breakdown:
- In the top row, place three sticks straight across.
- For the middle row, simplicity is the game. Just place a single stick right in the center cell.
- The bottom row gets a tad more diverse: start with a stick on the far left, followed by a smooth stone slab in the middle, and conclude with another stick on the right.
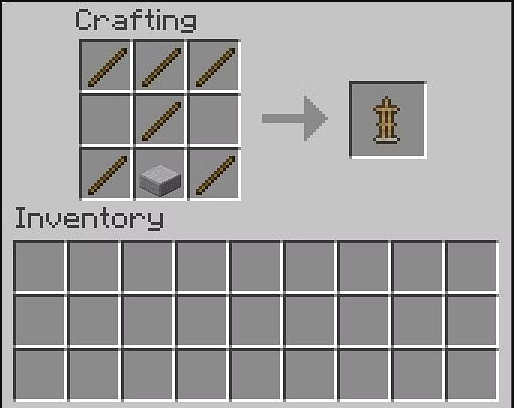
- Transfer to Your Inventory: With the armor stand recipe completed on the grid, you’re almost there! Now, just drag the newly formed armor stand into your inventory. And voilà, you’re equipped and ready to display your gear in style!
Remember, mastering the armor stand recipe not only offers an efficient way to showcase your items but also adds a personalized touch to your Minecraft environment.
Utilizing the Armor Stand Recipe in Minecraft
When you’ve mastered the minecraft armor stand recipe, the next step is to truly understand its utility. Unlike many other items in the game, the armor stand doesn’t come with a graphical user interface (GUI). This means you’ll engage with it directly, much like you would with signs or banners.
1. Direct Interactions
Crafting an armor stand is only half the fun. Once you’ve figured out how to make an armor stand in minecraft, it’s time to get hands-on. To adorn your stand, simply use armor or any wearable item directly on it. The items will be positioned neatly. If you wish to remove the armor, a simple tap with an empty hand does the trick. And here’s a handy tip for Bedrock Edition players: the hands of the armor stand are off-limits, so keep that in mind while dressing it up!
2. Strategic Positioning
Armor stands aren’t just static display units. With a dash of innovation, you can set them up in diverse orientations. They react to pistons, can be moved by water currents, tugged by fishing rods, or even bounced around using slime or honey blocks. Their versatile nature makes them perfect for creating dynamic in-game displays or dioramas.
If you want to learn more: How to Make Night Vision Potion in 8 Essential Steps
Behavior of Armor Stands in Minecraft
Understanding the behavior of the armor stand is pivotal in maximizing its utility and integrating it seamlessly into your Minecraft world. When set up using the proper armor stand recipe, the armor stand acts subject to the game’s physical laws, primarily obeying gravity. Therefore, they have the possibility of falling and resting on non-full blocks, adding a touch of realism to their presentation within the game environment.
Interactions with Other Items and Effects
The interaction of an armor stand with various objects and effects in the game is varied and nuanced. Learning how to create an armor stand in Minecraft is just as important as mastering these interactions. Armor stands, for example, can display a variety of armor, whether colored or enchanted, giving a thorough perspective of the wearable’s aesthetics and features. However, not all of the enchantments on the armor are functioning while on the stand. Certain enchantments, such as Frost Walker and Depth Strider, have effects only when they are driven by pistons or interact with water, respectively.
Furthermore, armor is resistant to specific creatures such as cacti, retaining structural integrity when in touch. They are vulnerable to other elements, such as arrows, explosions, and specific splash potions, and react with distinct, programmed behaviors when they come into contact with them. Understanding the complexities of interaction improves the use of armor stands, making them a versatile and entertaining component in your Minecraft projects.
Displaying or Concealing Arms on Your Armor Stand
In Minecraft, the ability to show or hide the arms on your armor stand provides an extra layer of customization. It might seem like a small detail, but it can make a world of difference when displaying items or setting up scenes. If you’ve already mastered the armor stand recipe, this is the next step to up your game!
1. Accessing the Chat Interface
To get started, you’ll need to pull up the chat window. This is the gateway to a multitude of commands in Minecraft, and it’s where you’ll input the command to modify your armor stand’s arms. Simply press the chat key (usually the ‘T’ key) to open this window.
2. Inputting the Specific Command
Once you’re in the chat window, it’s time to type in the command to either show or hide the arms of your armor stand. Depending on your preference, you’ll use the following syntax:
/data merge entity @e[type=armor_stand,<selector>] {ShowArms:<value>}
The <value> can be set to ‘1‘ if you want to display the arms, and ‘0‘ if you wish to conceal them. The <selector> part helps you narrow down which specific armor stand you’re targeting, ensuring precision in your customization.
3. A Practical Demonstration
For instance, if you wish to make a single armor stand show its arms, you’d type:
/data merge entity @e[type=armor_stand,limit=1] {ShowArms:1}
This command brings your minecraft armor stand recipe to life by giving your stand the ability to ‘hold’ items with its arms, adding another layer of realism to your creation.
If you want to learn more: Unleash the Full Power of Riptide Minecraft in 4 Easy Steps
Final Remarks
Dive into the enthralling world of Minecraft, and you’ll immediately learn the importance of constructing the ideal goods for your virtual adventures. The armor stand, a unique and flexible utility item, allows players to proudly display their treasured wearables. Your in-game home can resemble a tailor’s showroom with the correct armor stand recipe, displaying everything from dazzling armors to comical pumpkin heads. Consider this stand to be your mannequin, excitedly awaiting to model your latest Minecraft fashion purchases.
It’s not just about showing off your style when you include this stand into your games. It is a practical step for all players. Remember those anxious moments when you were rummaging through chests for your particular Elytra or that hard-earned helmet? The armor stand recipe provides a workaround. Set up these stands, and your favorite things will always have a dedicated spot. Using the armor stand efficiently becomes a game changer as you grasp the subtleties of Minecraft. So, why delay? Accept this recipe and improve your game experience!